
04.05.2024
Hey everyone it's Ken here from Northern. Viking every day today I have a quick. tutorial for you we're going to be. showing you how to reduce JPEG file. sizes on a Windows 11 PC maybe have. images that are in the jpeg format and. you need to upload them to a website or. share them in an email and they're just. too large today we'll show you exactly. how to reduce those file sizes down so. you can easily do that we're going to be. doing it on a Windows 11 PC with. software that is free and already on. your computer so let's go ahead and dive. right into it. foreign. so here we are on my windows 11 desktop. and I happen to have a couple photos. here on the left hand side they're. actually both the same photo but one has. the extension of dot jpg and the other. one has the extension of dot jpeg so. they're both jpegs they have a different.
Extension and the process I'm going to. show you today will work with either. extension so it doesn't matter which one. you're using today now the image itself. is of a recent cruise we did so this is. the photo we're going to be using today. it's a fairly high quality image if I. right click on the image and look at the. properties of the image you can see that. the file size itself is 2.04 megabytes. and the size of the image the pixels are. 4 000 by 2252 so we're gonna reduce that. down today reduce that file size for you. now something to keep in mind is that. when you reduce the file size of course. your image quality is going to go down. as well so the app we're going to be. using today to reduce the size is the. photos app that's included with a. Windows computer so let's go ahead and. find our photo whether it's on your.
Desktop or you search for it with your. file explorer in your pictures area go. ahead and find that photo so mine's here. on my desktop we're going to right click. on the photo not left click but right. click we want to make sure that our. photo is actually opening up in the. photos app if it's not set as your. default so once you've right clicked on. it you'll see a little menu that pops up. here and there's an option that says. open with and there's a drop down here. and we're looking for the one that says. photos go ahead and left click on photos. and it's going to open up that photo in. the photos app now from here what we're. looking for is the three dots so you'll. see the three dots here at the top in. the center for myself if you're using. Windows 10 I believe it's in the top. right hand corner but look for those.
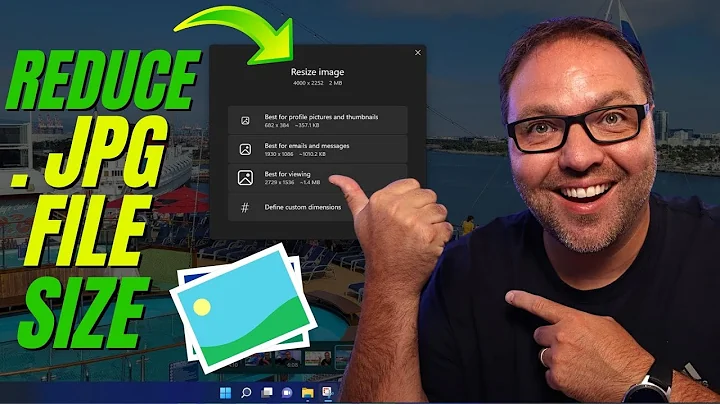
Three dots and when you left click on. that a whole bunch of different options. are going to come up and you'll see an. option here that says resize change this. size of your image so go ahead and left. click on that and it's going to give you. a whole bunch of different options here. so it says resize image it shows you the. dimensions as well as your file size of. the original file then it gives you. three different options so the first one. would be the smallest one best for. profile pictures and thumbnails gives. you the resolution that that would be. 682 by 384 and an approximate file size. of. 357.1 kilobytes so if you want it small. you can do that you've got an option for. best for emails and messages that one. would be a thousand and ten kilobytes. and then best for viewing a higher. resolution image at 1.4 megabytes now if.
Those don't work for you there's also an. option here at the bottom that says. Define. custom Dimensions you could go ahead and. left click on that and this will allow. you to put in custom Dimensions so maybe. you need it to be a thousand for the. width it'll automatically put in the. height for you as long as you have this. maintain aspect ratio here checked off. now you can also adjust the quality here. from high at 100 percent all the way. down to 10 for low you can adjust that. with the slider right there I'm going to. back out here and I'm going to just do. the smallest one here so best for. profile pictures and thumbnails we'll go. ahead and left click on that and it's. going to ask me to save my file or where. I'd like to save it as save as so we can. select here on the left hand side maybe. you want it in pictures I'm going to go.
Ahead and select desktop. we can change our file name I'd like to. change my file name because I want to. keep the original as well I don't want. to overwrite that so we're going to. change our file name I maybe I'll call. this one smaller image you can type in. whatever you like there and then we can. also select our file type it's currently. selected as JPEG or dot jpg you can do. dot jpeg you can do dot PNG you can do. dot BMP so there's a whole bunch of. different options there I'm going to. leave that on dot jpg from there we're. just going to go ahead and hit save and. it should save that image to our desktop. so let's go have a look here I'll close. this out there it is it says smaller. image if I right click on that and look. at the properties. you can see that the file size is quite. small 56 kilobytes and the details there.
it's 682 by 384.. and let's open that up there you can see. it's much smaller in my viewer the. quality of the image will be reduced but. you could easily use it now for. uploading to maybe a website that needs. a smaller image or emailing it to a. friend so really it's that simple to. reduce your JPEG file sizes here on a. Windows 11 PC so I hope this quick. tutorial helped you reduce your file. sizes of your jpegs if this video did. help you out make sure to give it a. thumbs up also remember to connect with. me on social media and subscribe here on. YouTube thank you so much for watching. and until next time take care